"We're going to work with shapes today. Shapes will be sorted into groups. After that, we'll be creating variously shaped animals."
Give your students an introductory reading assignment: Lois Ehlert's Color Zoo. Read an alternative book about shapes and colors if you don't have the recommended one.
"I'd like to read you a book before we start our sorting activity. Let's examine the front. What topic do you anticipate our book will cover?" Ask students to make predictions and suggestions regarding the book. "Color Zoo is the book's title. It was written by Lois Ehlert. The animals are made of shapes. Let's check our recognition of shapes while reading."
While you read, quiz the students on the book and its shapes. Possible sample questions are as follows:
"How many squares are on this page?"
"What hue is this triangle?"
"On this page, how many shapes are there?"
"Let's count every circle."
"Who can identify a four-sided shape?"
"What shape is cut out of this page?"
"How do the triangle and square compare?" (They both have corners and sides.)
"What differences exist between a square and a triangle?" (One has three corners and sides, while the other has four.)
"There are shapes inside this envelope I have. Some shapes are similar and some are different. Even though the squares may vary in size and color, they are still squares." Give a couple of examples from the bag.
"I'll split you up into pairs. There is a shape-sorting task for each pair. You and your partner need to tell me how you sorted your shapes when I approach your table. What does sorting shapes mean?" (Our piles must, in some way, be the same when we sort our shapes.)
"What methods could you use to arrange the shapes?"
After asking them to turn and speak with a classmate, invite them to present their ideas to the group. (I prefer to sort by color, but shape would also work well.)
Hold up two different-sized squares if the students fail to mention sorting by size. (We may arrange our shapes according to size.) "You're correct. It is a size-based sorting. Now that I've distributed the envelopes, you and your companion can start sorting."
Observe or listen as students sort their shapes as you move around to look over their work. Tell each pair to arrange the shapes differently before you depart from their workspace.
"How were the shapes sorted by this pair?" (We sorted according to size. As you can see, every large shape is in this pile, and every small shape is in the other pile. We finished it quickly.)
Ask students to identify the shapes you point to. Ask them how they determine that the shape is a circle, square, etc. You can test students' knowledge of shapes and colors by asking them questions as you visit each table.
"What shape is this?"
"Could you locate and hold up a triangle?"
"What hue is this circle?"
"How many sides does a square have?"
"Find a rectangle. What is the number of its sides?"
"How do you recognize that this is a circle?"
"Your group sorted the shapes according to size. Can you come up with another method? I'll be back shortly to see how you're doing."
Once you have visited every workspace at least once, ask the students to replace the shapes in their envelopes. Then, as a class, go over how they sorted the shapes.
"How did you sort your shapes?" Write the students' answers on the board.
"Do you recall reading Lois Ehlert's Color Zoo at the start of math class? We are going to create a textbook that is comparable to the one we are reading. You are going to get to pick up an animal from the zoo. Then, using the shapes I set out on your table, you will have to construct the zoo animal. Raise your hand if you need more shapes, and I'll refill your bowl. Here are a few more images from the book that we can review."
Show your students some pages from the book Color Zoo to help them remember that the animals are made out of shapes. Once you and the students have read the book one more time, explain to them that each will be creating an animal out of shapes.
"I put bowls on your table with shapes and glue. Everyone must choose the zoo animal they want to create. I'll make a lion to give you an example." Demonstrate to the class how to construct a lion using shapes. As you do so, ask questions like these:
"How about this shape—what could we use for ears?"
"What shape could we use for a tail? Do any other shapes that might be suitable?"
"What shape could we use for the legs? Do any other shapes that might be suitable?"
"What shape could we use for the body? Do any other shapes that might be suitable?" Are there any other shapes that would work?”
"What shape could we use for the eyes? Do any other shapes that might be suitable?" Are there any other shapes that would work?”
"To create the lion, how many triangles did we need?"
"How many circles, squares, triangles, etc. did we use?"
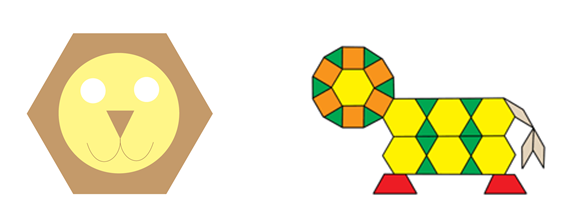
"Well done; you'll soon have the opportunity to create your creature. Please come pick up your paper. Return to your table, then get started." Asking students to select their animals and begin working should not stop. To provide diversity for the class book, encourage students to select a variety of animals. Instruct students to write their animal's name at the bottom of their page.
You can evaluate students by posing questions while you monitor their progress. When you read the completed book to your class later, you can use these same questions. Some examples of questions are as follows:
"What shape is this?"
"What is the number of rectangles on your animal?"
"What hue is this star?"
"How many sides is a triangle made up of?"
"Show me a rectangle. How many sides does it have?"
"How do you know this shape is a circle?"
"How many different shapes make up this lion?"
"What similarities and differences exist between the square and the rectangle?"
"What similarities and differences exist between the shapes in this image and the shapes in another image?"
Ask students to share their animals in small groups after they have finished each one. The names of the animals the students created and the shapes they used will be shared. Assemble the book after all students have had a chance to talk about their shaped animals. Place the book in your room library and read it aloud to your students the next day. Because this is a book that students will read repeatedly throughout the year, laminate every page if at all possible for durability. You can use the sample questions provided above to gauge your students' comprehension as you read the book to them.
Students will work on their animal pictures while you have the chance to grade them. It might be necessary to divide the class into smaller groups to assess the students' learning later on or to get more clarification on their understanding.
Extension:
Using practical experience in small groups and at workstations is the best way to customize this kind of instruction. By using routines and mini-lessons to review shapes and colors throughout the year, teachers can help students understand concepts and brush up on vocabulary and skills.
Based on formative evaluations and observed student ability, you can divide students into smaller groups. Various small-group exercises can be chosen for each student's unique needs.
Throughout the year, adapt the following activities to your classroom to meet the needs of your students:
Routine: Mystery Shapes: Stack a collection of pattern blocks where every student can see them. Go over each shape's name with the students. Give the names of the pattern blocks to the students, then ask them to pick one out of a pile of blocks on their desks.
Then, place a pattern block inside a clear bag. Do not allow students to see the shape you placed in the bag. Ask a student or two to feel the shape. Ask the students to describe their feelings to one another.
How many sides are there?
Are they curved or straight?
Big or tiny?
Do the sides have the same dimensions?
After the students have finished expressing their feelings, invite the remaining students to share their theories about the shape of the bag. Ask students to justify their ideas. Do this multiple times a year.
Mystery Shapes Variation: Every student needs to have a set of pattern blocks or a set of paper pattern blocks (M-K-4-1_Pattern Block Shape Cards) on their desk.
Follow the above instructions, except for asking students to identify the shape they believe is in the bag at that point. Students should use the paper Pattern Block Cards to share their thoughts with you. This enables you to view everyone's answers simultaneously.
"All right, we heard Selma explain the shape inside the purse. It's your turn now to identify the shape you believe is inside the bag. Examine the pattern block cards on paper located at the top of your desk. I want you to pick up the card you believe best depicts the shape inside the bag on a count of three. Are you ready? One, two, three..."
If students finish their work early, have a container of cut-out shapes available for them to create additional animals.
Expansion: Go through a book on two-dimensional shapes. The book Alphabet City by Stephen Johnson features numerous typical shapes that we encounter every day. Students can look around the classroom to find more examples after finishing the book.
Ask students to use paper shapes to create intriguing settings and characters. After that, ask them to compose a tale based on their inventions.
Small Group: Making Patterns with Shapes: Provide students with cut-out pattern block shapes (M-K-4-1_Pattern Block Cutouts) or show them a container filled with pattern blocks. Examine the characteristics and names of each shape. Inform students that we can use the pattern blocks to create a variety of shapes. Show the students how to construct various shapes by combining the blocks in different ways.
Encourage students to create things in their surroundings by utilizing shapes. While they are working on this task, assess the students by posing questions.
Shape Booklet: Provide students with cameras in small groups and encourage them to take pictures while searching for geometric shapes on the playground and in the school. Once the pictures from each group have been printed, assign the students to create little shape books called Shapes at Our School (M-K-4-1_Shapes at Our School). Students can either write or adhere the shape names to each page along with the pictures.
If cameras are not available, students could cut out pictures from magazines or draw pictures to create booklets.
(Option: If the classroom has access to technology, assign students to use it to manipulate shapes and use tuxpaint (http://www.tuxpaint.org )).
Workstation: Exploring Shapes: Place paper copies of pattern blocks or pattern blocks (M-K-4-1_Pattern Block Shape Cards) inside a container and allow students to build and explore.
Shape Pictures: Provide students with an image from a for-profit book such as Learning Resources' Patternables Activity Book (www.learningresources.com) or make your own, then let them fill it in with pattern blocks.
Here is an example page from the Patternables Activity Book, a teacher resource book: http://www.learningresources.com/text/pdf/0336book.pdf


